A few years ago, I published a post about creating a docker bot. A lot of fun learnings went into that post, but it’s been 4 years and I went down the rabbit hole of making another discord bot from scratch. So I figured, if it’s time for a new bot, it’s time for a new blog post. We’re still leveraging the discord.js package, but with new ways of doing things and a new hosting model.
This is another random ADHD project I threw together in a weekend then iterated on a little bit to make it easier to gather my thoughts. The upside is this time I have a mostly working GitHub repo this time.
The Basic Idea Revisited
I still think Discord bots are neat. Every so often I run into a fun intersection of “Thing I want to do in Discord” and “Thing I can automate”. So I’ve once again hit that intersection and thought “I could make a bot out of this.”
A little while ago I joined a new server and they have a cool system where if people want to host an event, they make a thread for the event in a specific events channel and conversations around the event happen there. They aren’t using the “Events” feature in Discord because there are a lot of events and they want to use the official tooling for the main server events, not a random BBQ. I figure that the creation of the threads and posting about the event could be automated so things are easier to get going.
So without further ado, let’s get going.
What’s Different This Time?
Some things I’m doing differently in this bot is:
- Better Multi-Server support
- Azure Table Storage instead of a json db using
lowdb - Automating Deployments
Getting Started
Note: Parts of this guide will be similar to the original post, so for small things I’ll duplicate it here but some sections are identical and I’ll just link them to the original post.
I’m still a big fan of VS Code so all of the work I’ve done for this bot was written in VS Code (including this blog post). You’re welcome to use any editor you want, but I may reference plugins that may not exist in every editor. You’ll also need nodejs (I’m up to 20.9.0 now) and a Discord account. Get one at discordapp.com. I’ll also be doing this in Typescript since I like actually having a type system, but this can all be done in TS or JS.
This time around I’m going to try and cover the CI/CD setup I’ve thrown together, so if you want to follow along yourself, you’ll want to have a GitHub account and Docker installed.
This post got pretty long, so I’m going to break it up into a few part. I’ll include links to all of the parts in each post. New links will be added as new posts are published.
- Creating a Discord Bot with Azure Container Apps - Part 1
- Creating a Discord Bot - Part 2: Integrating Azure Resources
- Creating a Discord Bot - Part 3: Deploy Using GitHub Actions
Create the bot on Discord
Much of this is going to be the same as in the original post, but there’s a couple changes. Since this bot will be using commands instead of reading every message, we don’t need to have admin permissions.
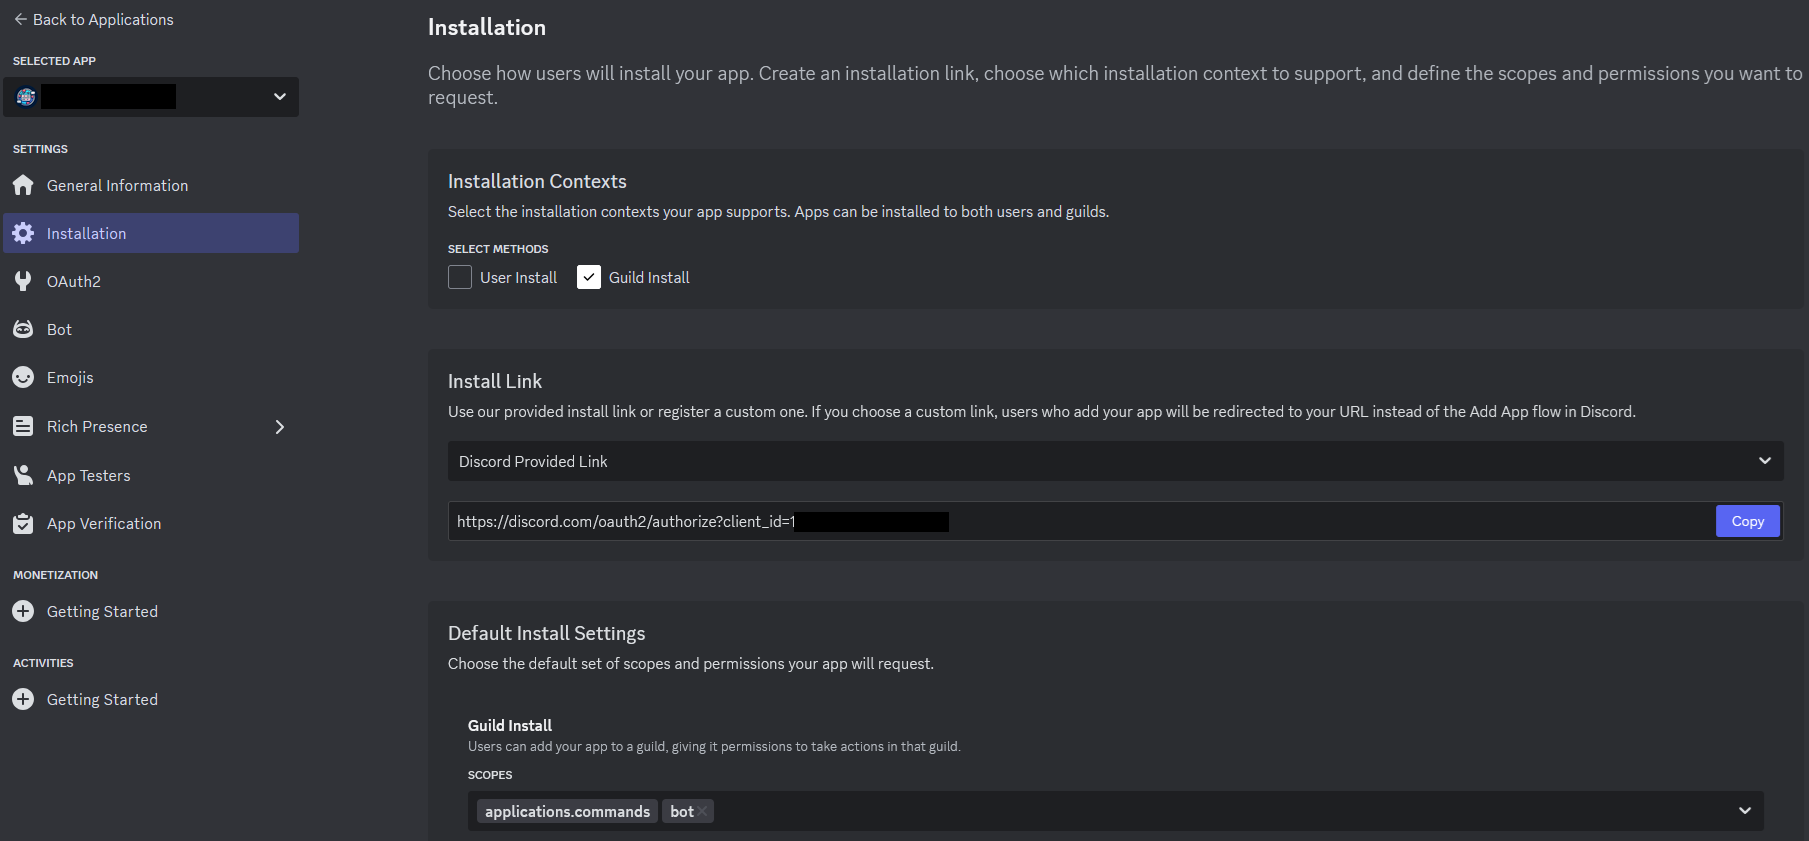
Create the Application, add the bot, and note down the Client ID and Token as before. This time, however we can leverage the “Installation” section to make our lives a little easier.
Since this is going to be installed in servers and not used directly with users, you can uncheck “User Install”. You can note down the install link from Discord as that’ll be used later to install the bot in a server.
Under “Default Install Settings” you’ll want to set “Scopes” to applications.commands and bot. This will ensure the bot can use commands and appear in the server as a bot. You can leave “Permissions” blank as we won’t be using them.
2. Set up the bot code
If you want to follow along yourself, I’ve set up a template repo on GitHub to make it a little bit easier. It already has the package.json, tsconfig.json, and src/index.ts files created. Once you’ve cloned it, you should run npm install to get all the packages downloaded to your node_modules.
It also has a file named .env.example. I’m using the dotenv package to handle secrets when working locally. For now, you should rename the file .env and add your Discord Client ID and Token. The .env file is in the .gitignore so it won’t be checked in with your secrets.
2.1 Adding the Config from the Environment
Create a new file in the src directory called config.ts. This is where we’ll load our environment variables. When running locally this will pull from the .env file. In Azure it’ll load from the environment.
Let’s start adding the content to the file. First off, we want to import dotenv and tell it to load the configs. This will take the variables in the .env file and add them to the process.env in node.
| |
Now that the configs are loaded, we can bring in the ones we care about and export them so other parts of the bot can use them:
| |
Right now this only has the Discord bot information, but we will also add information about the Azure Storage Account we’re using a little later on.
2.2 Setting up the bot client
Now that we’ve added the config.ts file, let’s use it in index.ts and set up the Discord client. Right now we’re just importing the Client type and creating a new one with nothing else going on.
Let’s bring in the config at the top. Right below the first import statement, add:
| |
Now let’s look at the client. Right now we’re not registering any intents, but we can improve performance by telling Discord what we care about. In the intents array, add GatewayIntentBits.Guilds which will allow us to get notified when the bot gets added to a server. It should look something like this:
| |
Now that we’ve set up the client, let’s ensure we subscribe to the events we care about. The two main events we’re looking for are guildCreate which happens when a server adds the bot and interactionCreate which happens when someone runs a command or interacts with the bot. We don’t need to register an intent for interactions as Discord knows we always need to handle interactions that our bot has defined. We can also set up a one-time handler for the ready event which tells us that we’ve successfully connected to the discord gateway.
Add this code for now and we’ll worry about filling in the implementations in a bit:
| |
Now we just need to actually tell the client to connect, so put this at the bottom:
| |
2.3 Add our first command
The way we’re going to set up the commands in this project is one file for each command and an index file that will export them all as one object. Each command file will have two exports:
datawhich is an object that will have the information about the command so Discord can render it.executewhich is a function that will handle the command.
Now that the client is ready to go, let’s make some stuff for it to do. We’ll start with a /help command. Create a new folder in /src named commands and create two files:
index.tshelp.ts
Creating the help.ts command
In help.ts let’s import the pieces we’re going to need from the discord.js package
| |
Data
Now let’s define the data object:
| |
Let me break down what is going on here:
| |
First we create the builder for the slash command. This will give us a fluent API to construct the information about the command.
| |
Now we use these fluent apis to tell Discord that the command is named “help”, which means a user will be able to type /help to run the command. We then give Discord a description to show when the user selects the help command in the command list.
| |
Finally we tell discord that this command can only be used in a Server.
Execute
Now that the data is defined, we need to define our execution method.
Start by creating a new function:
| |
Now let’s handle the interaction. For the help command, we want to return a response to just the user who sent the command and have it format nicely. To do this we’ll create an Embed and then use the interaction object to reply. To make sure that only the user who ran the command sees the reply, we’ll use the ephemeral property on the reply object.
Let’s start by setting up the Embed. This also uses a builder pattern with a fluent api, just like the slash command builder.
| |
For the most part, this fluent api is pretty self documenting. We create an embed with a title, a description, some fields with the commands, and create a footer with the timestamp. The only part that isn’t obvious is the .toJSON() at the end. This method will serialize the Embed and run validations so if we do something wrong it’ll throw an error here before we try to reply.
Now that the embed object is created, we can easily send it by doing:
| |
That will finish off the help.ts file. Let’s set up the index.ts file now.
Creating the index.ts file
Let’s implement the index.ts file in our commands directory. All this file does is aggregate the command files into one object.
For now the entire file will just be:
| |
One important note: I’ve ensured the name of the property in the commands object matches the name of the command in the data.
2.4 Bring the Help command into the bot
Back in the src/index.ts file, we can now import our commands object right below our config object:
| |
Now let’s update the interactionCreate handler to call the correct command handler:
| |
We need to use commands[commandName as keyof typeof commands] because typescript doesn’t like it when we abuse objects in this way normally. If there’s a better option here, please reach out to me and I can update this post.
Now we’ve defined our command handler for the help command, but we have a problem. We haven’t told Discord about our commands yet.
2.5 Tell Discord About our Commands
We need to tell discord what commands we support, and we need to do it for every server. Let’s start by setting up a function to handle deploying the commands.
2.5.1 Deploy Commands function
In the src directory, create a new file named deploy-commands.ts. We need to import a few things at the top of this file:
| |
Now we need to turn the commands object into an array of data. We can do that with some built in Javascript tools:
| |
Check out the MDN for more info on Object.values and Array.prototype.map
We still need a few more things before we are ready to deploy the commands. We need a Discord REST client and the actual deploy function. Let’s get those added now:
| |
We’re setting up the rest client outside of the exported function because we only need one instance instead of newing it up every run, and we’re adding a new type to make the function definition a little more readable.
The implementation of the function is fairly straightforward:
| |
2.5.2 Wire up the function
We’ve made our deploCommands function, now let’s get it wired up. Back inside of index.ts we still have that guildCreate event. We can use that to add the commands whenever a new server get’s added.
At the top of the index.ts file, we can add another import below commands:
| |
Then we can wire it into the guildCreate handler:
| |
Now whenever a server adds the bot, we will automatically install the commands. Now, we have one small problem: what happens if we add a new command after the server has joined? This is really important while developing the bot as you don’t want to have to keep removing and readding the bot. My solution was to update the commands the first time any command is sent from a server.
Now I know this isn’t scalable if the bot is being added to a ton of servers frequently, especially if you have to get into sharding (a topic for another post). This solution is fine, however, for a small bot and during development.
At the top of the index.ts file, right after the deployCommands import, we can add this:
| |
This will be our “Cache” of servers we’ve seen run commands. This will be reset every time the bot restarts, which is exactly what we’re looking for here. Inside of the interactionCreate handler, we can add some more code to handle deploying the commands:
| |
This will call deployCommands() if we have the guild id and the guild id has not been seen this run.
And with that, we now have a functioning bot. You should be able to run npm run start and the bot should connect. You can then use the install link from earlier to add the bot to your test server and run the /help command.